Unlock Your Store’s AI: A Guide to Connecting WooCommerce with Maika Hub
In the rapidly evolving world of e-commerce, leveraging Artificial Intelligence is no longer a luxury—it's a strategic advantage. It's the key to personalizing customer experiences, automating tedious tasks, and unlocking insights that drive growth.
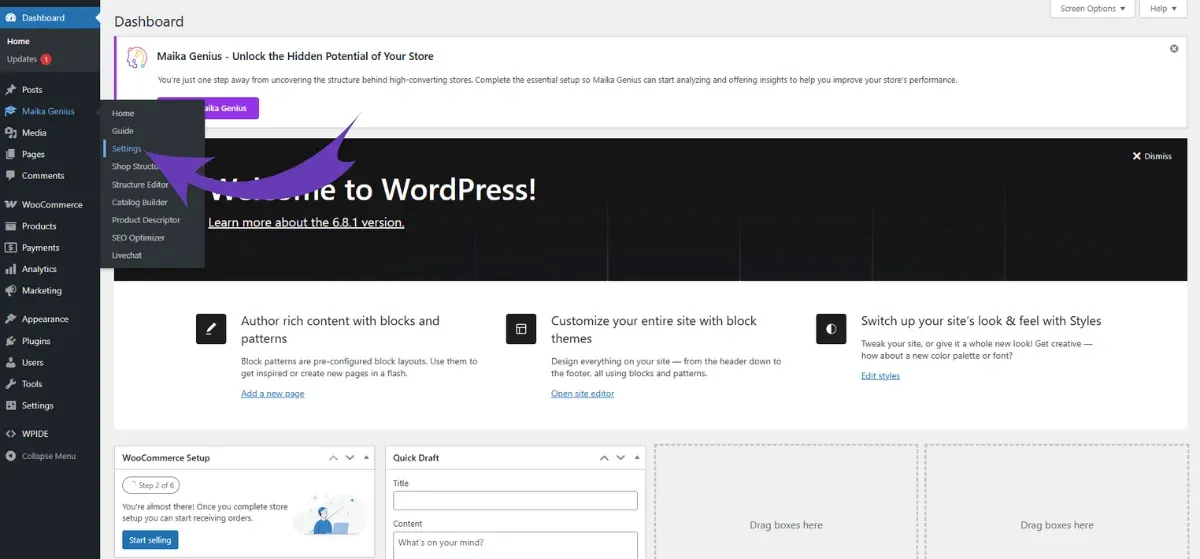
In our previous guide, we showed you several ways to install the Maika Genius plugin on your WordPress site. With that, you’ve laid the foundation. Today, we take the most crucial step: bridging your store with the powerful AI brain that will bring it to life. We will guide you through connecting your WooCommerce store to the Maika Hub.
Many users wonder why an external connection is necessary and, more importantly, if it's secure. This guide will not only provide a detailed, step-by-step walkthrough of the connection process but also demystify the "why" behind it, assuring you that your data and your store are in safe hands. Let's transform your standard e-commerce site into an intelligent, responsive, and powerful selling machine.
Why Connect to an External Hub? The Maika Genius Architecture
Before we dive into the "how", let's address the fundamental "why". Why can't the AI just run entirely within your WordPress installation? The answer lies in the immense computational power required for true Artificial Intelligence.
Think of the Maika Genius plugin on your site as the sophisticated nervous system—it integrates seamlessly with your products, attributes, and user interface. However, the Maika Hub is the powerful, off-site brain. It houses the complex algorithms, machine learning models, and vast processing capabilities needed to:
- Learn Your Catalog: Analyze every detail of your products—descriptions, images, categories, and attributes—to understand them contextually.
- Generate Content: Create compelling, SEO-friendly product descriptions, blog posts, and marketing copy tailored to your brand voice.
- Provide Recommendations: Understand customer behavior to offer intelligent, personalized product suggestions that increase cart value.
- Power Intelligent Chat: Handle customer queries with a sophisticated AI chat assistant that learns from every interaction.
Hosting this "brain" externally allows Maika Genius to deliver these powerful features without slowing down your website's performance. The connection is a secure data conduit, not a vulnerability.
Is This Connection Secure? Absolutely.
The connection process we're about to undertake doesn't involve sharing your main WordPress login credentials. Instead, we will generate specific, single-purpose keys (Application Password and WooCommerce REST API Key). This is a modern, standard, and highly secure method used by countless applications to communicate. It ensures that Maika Hub has only the precise permissions it needs to read your product data and write back the AI-generated enhancements—nothing more.
With that understanding, let's proceed with the connection.
The Step-by-Step Connection Guide
We've made this process as straightforward as possible. All you need is administrator access to your WordPress dashboard. We'll accomplish this in two main phases: generating your unique security keys and then using them to connect to the Maika Hub.
Phase 1: Generating Your Secure Keys in WordPress
First, we need to create two sets of credentials within your website. These act as secure access passes that you'll provide to Maika Hub.
A Critical Note Before You Begin:
Both the Application Password and the WooCommerce REST API keys will be displayed only once upon creation. It is essential that you copy them immediately and paste them into a secure temporary location, like a notepad or a password manager. If you navigate away from the page without saving them, you will have to generate new ones.
1. Creating the Application Password
This password allows Maika Genius to make authorized changes on behalf of your admin account, such as updating information with AI-generated content.
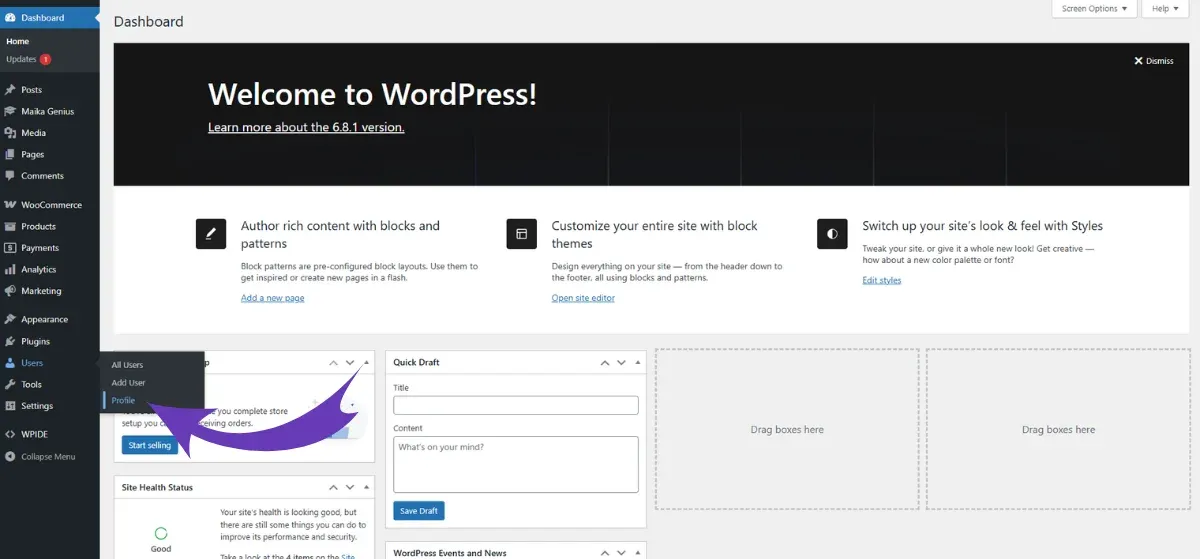
Step 1: From your WordPress Dashboard, navigate to Users > Profile.
Step 2: Scroll down the page until you find the section titled Application Passwords. It's usually near the bottom.
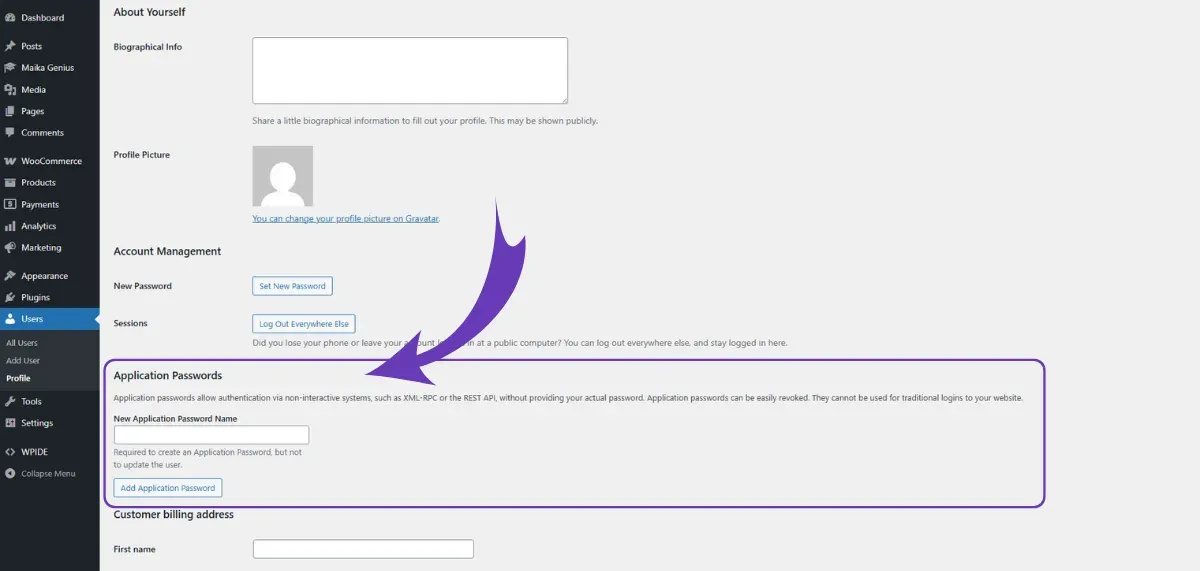
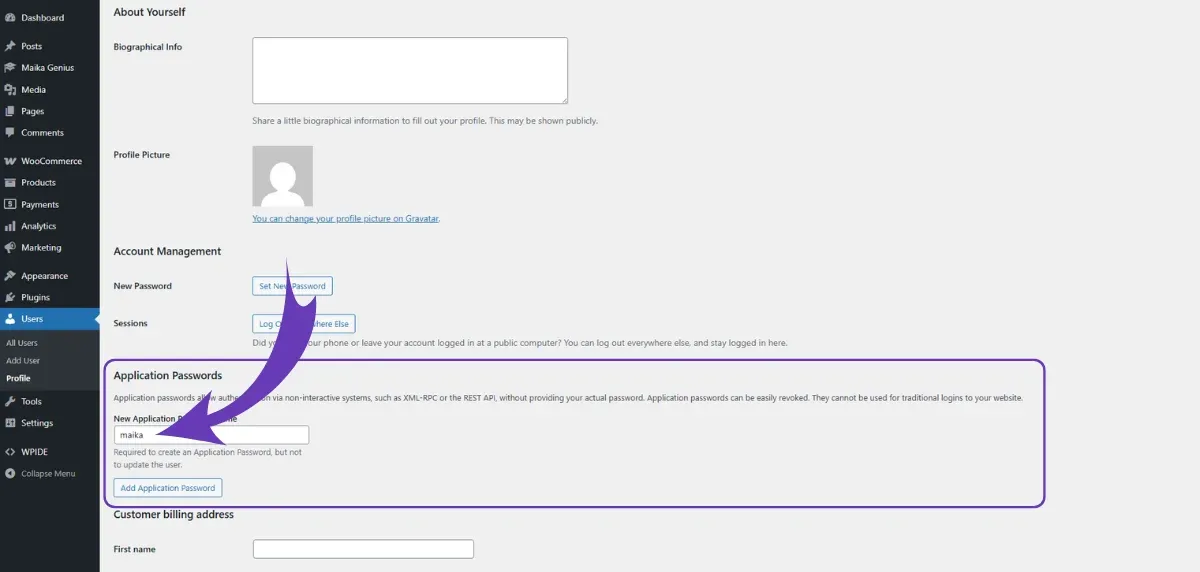
Step 3: In the "Add New Application Password" field, enter the name maika.
Action Required: Enter the Name Correctly!
You must enter the namemaikaexactly as written, in all lowercase. This is not just a descriptive label; the Maika Genius plugin is specifically coded to search for this exact name to authorize its connection. Using any other name will cause the connection to fail.
Step 4: Click the "Add New Application Password" button.
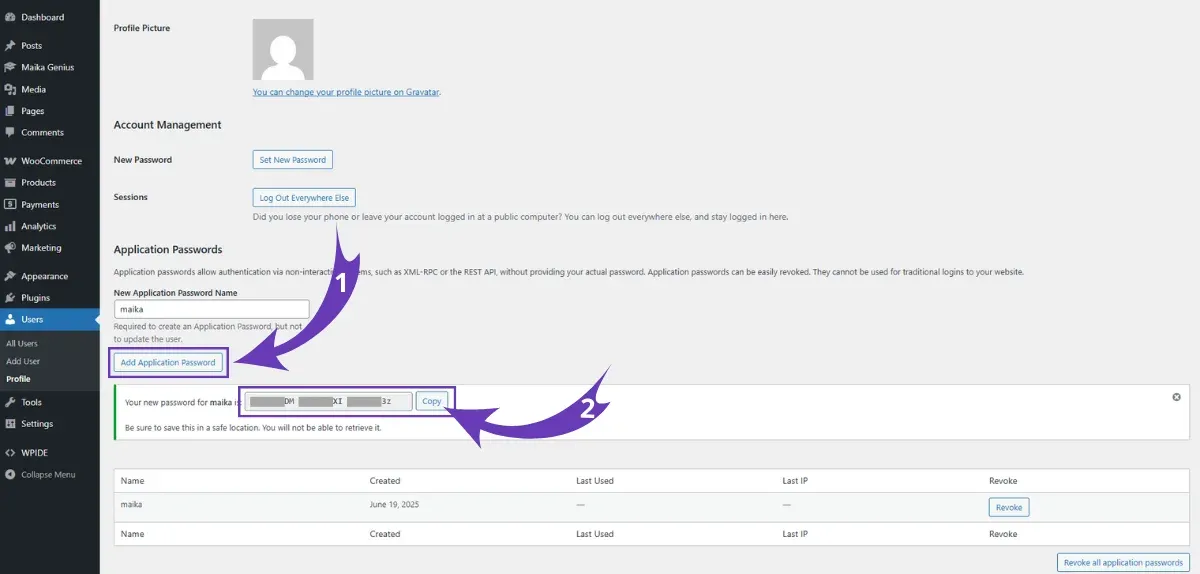
A new password will be generated and displayed. It will be a string of characters separated by spaces. Copy this entire password now and save it.
2. Creating the WooCommerce REST API Key
This key provides access specifically to your WooCommerce data, like products and orders, which is essential for the AI to learn and function.
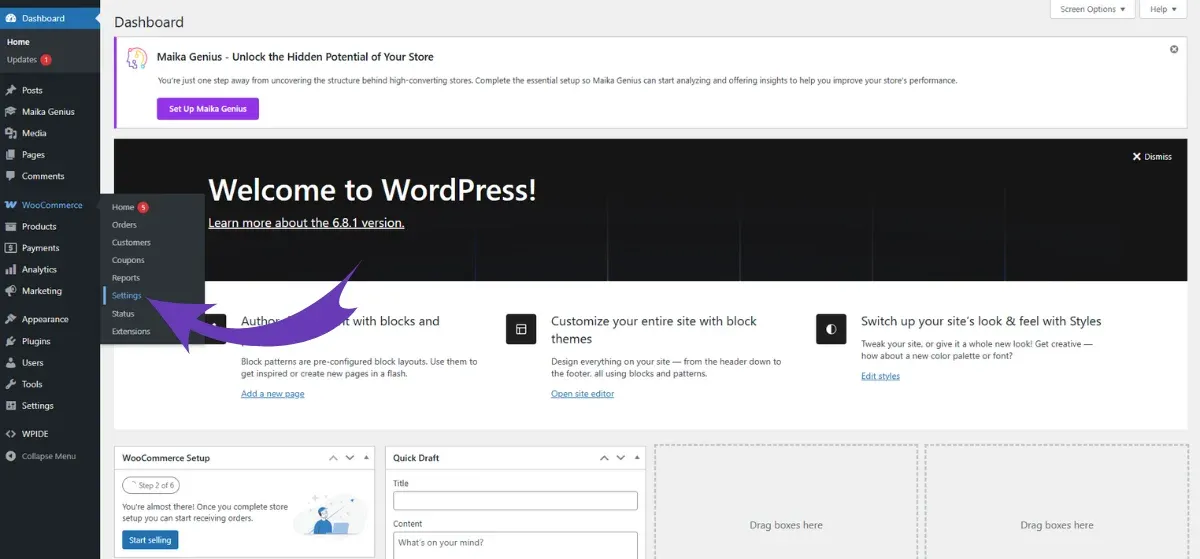
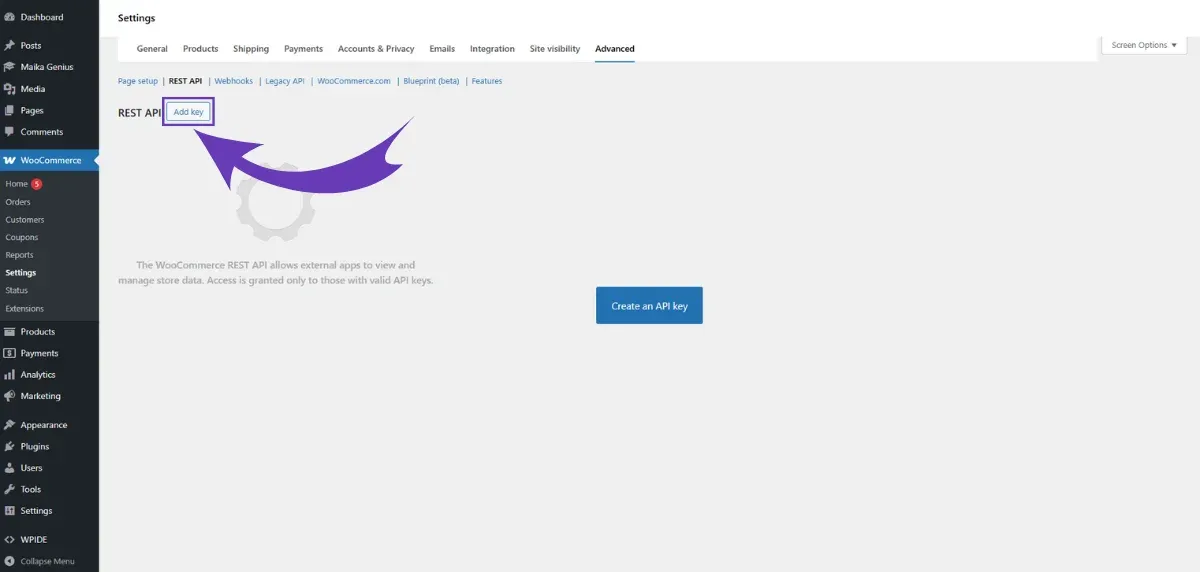
Step 1: From your WordPress Dashboard, navigate to WooCommerce > Settings.
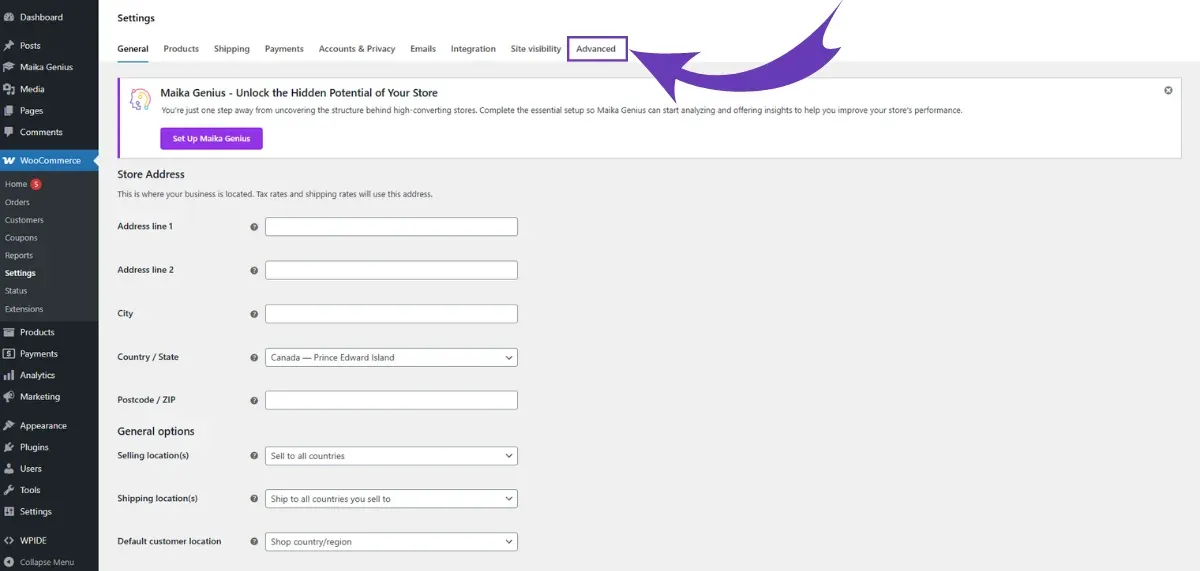
Step 2: Click on the "Advanced" tab at the top.
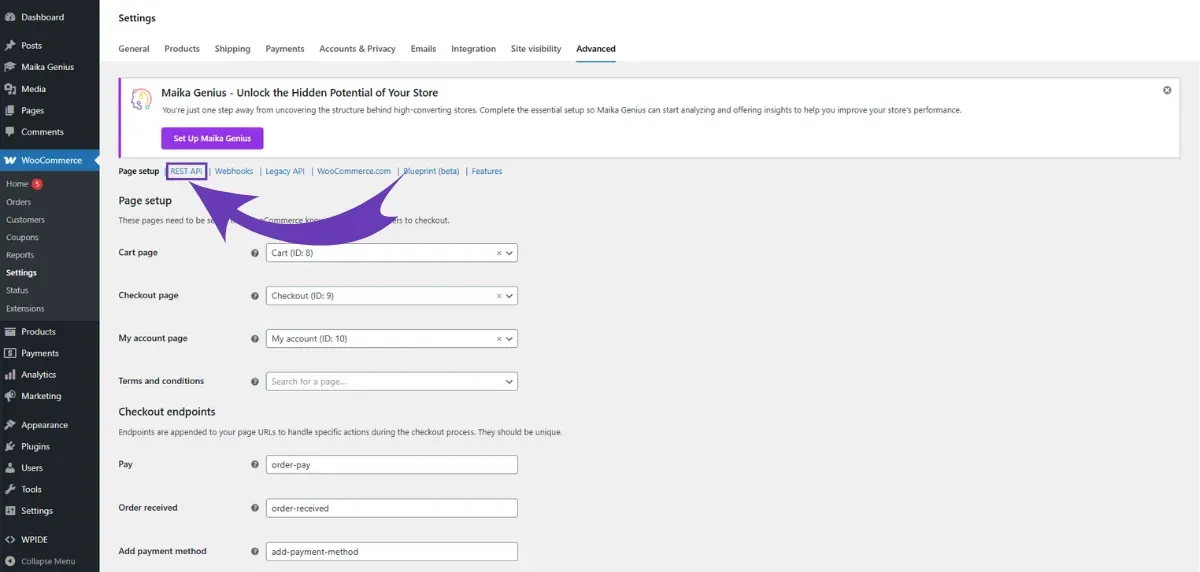
Step 3: Select the "REST API" sub-section.
Step 4: Click the "Add key" button to start creating a new API key.
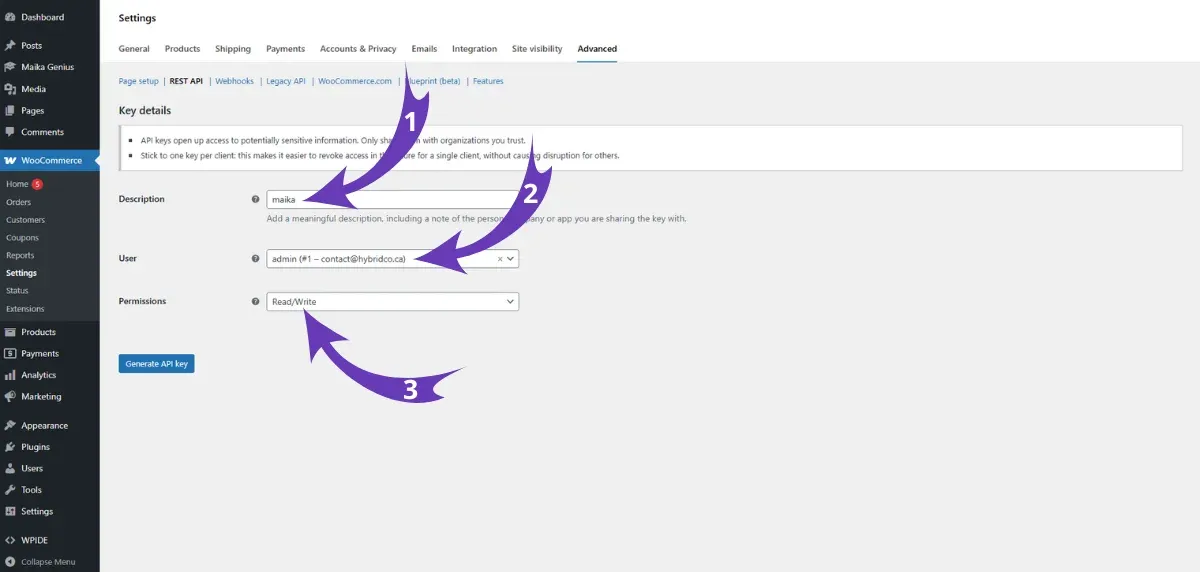
You will now be on the "Key details" screen. Fill it out with the following information precisely:
- Description: Enter
maika.
Crucial Step: Use the Correct Identifier
Similar to the Application Password, this field must be filled out with the exact wordmaika. It acts as a unique identifier that allows the Maika Hub to distinguish the key meant for its use from any other API keys you might have on your site. Accuracy here is essential for a successful connection.
- User: Select your administrator account from the dropdown menu.
- Permissions: This is the most crucial setting. You must select "Read/Write".
Why "Read/Write"? "Read" permission allows Maika Genius to access and learn from your product catalog. "Write" permission is what allows it to send back and update your site with the powerful content it generates, like new product descriptions or optimized metadata.
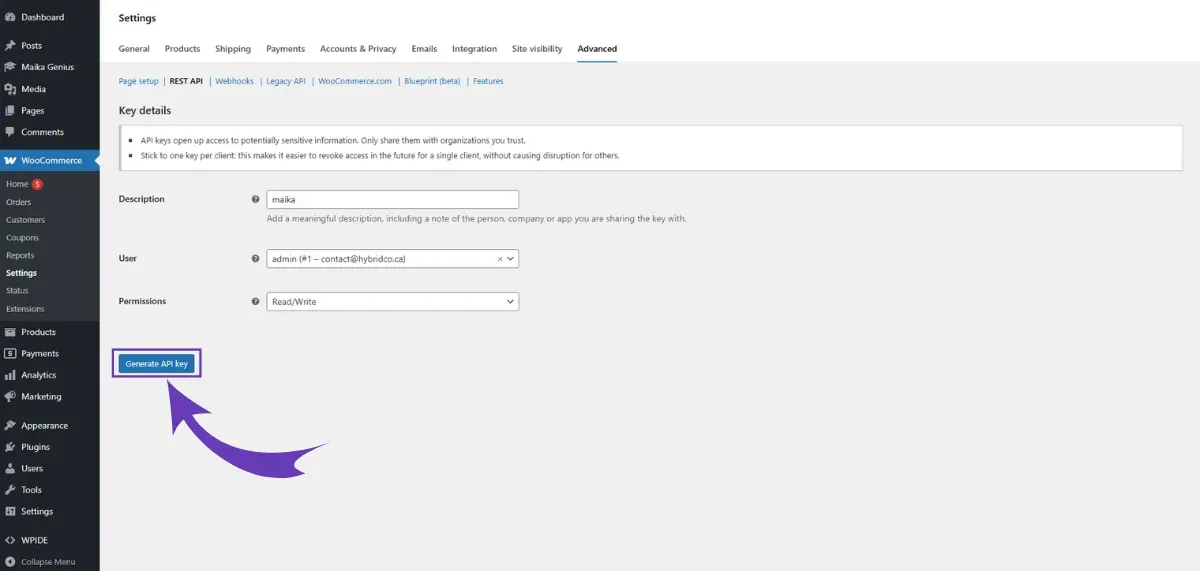
Step 5: Once the details are filled in, click the "Generate API key" button.
You will now see a screen displaying your new Consumer Key and Consumer Secret.
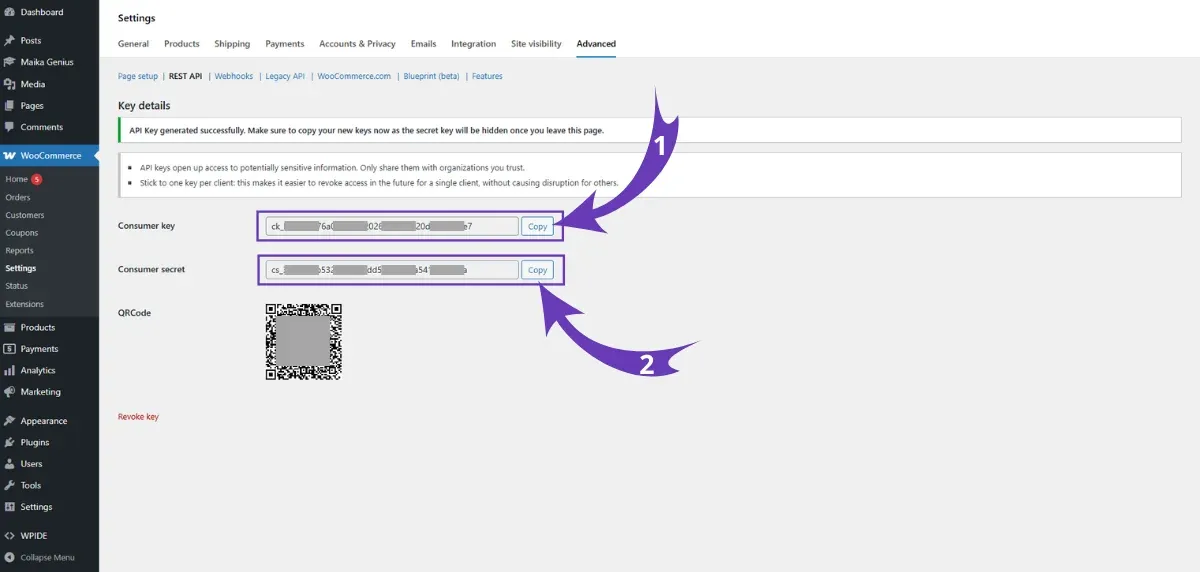
Final Reminder: Save Your Keys!
This is your only chance to see these two keys. Copy both the Consumer Key and the Consumer Secret and save them securely alongside the Application Password you created earlier.
You have now successfully gathered all the credentials needed. It's time for the final phase.
Phase 2: Connecting to the Maika Hub
With your keys safely stored, you're ready to establish the connection.
Step 1: Navigate back to the Maika Genius plugin settings in your WordPress Dashboard. You can find this at Maika Genius > Settings.
Step 2: The screen will now prompt you to finalize the connection. Click the button that says "Connect your WordPress with Maika".
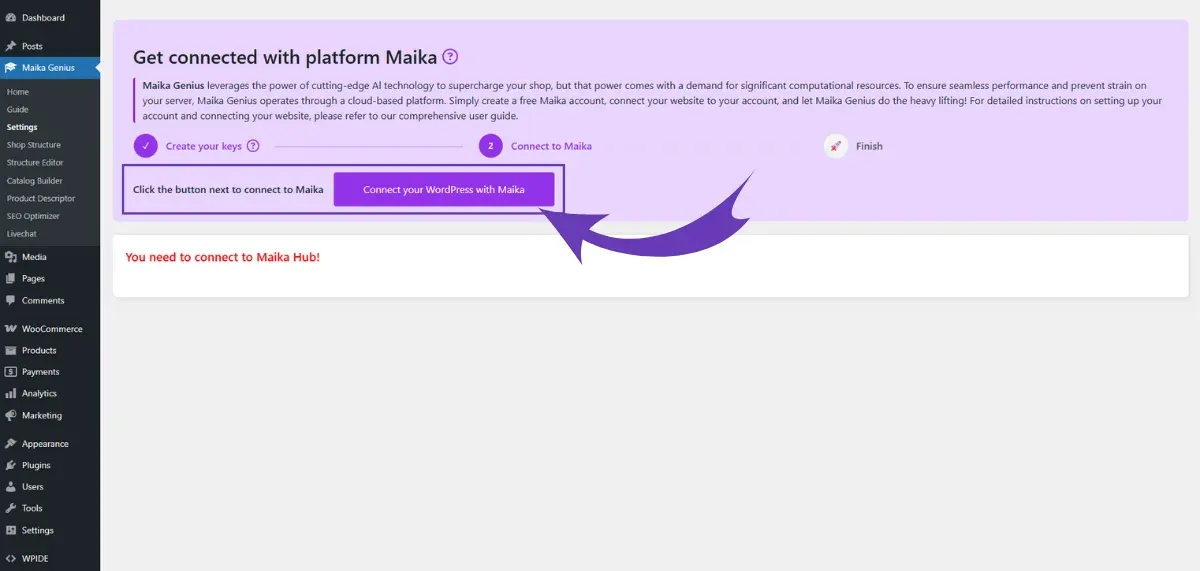
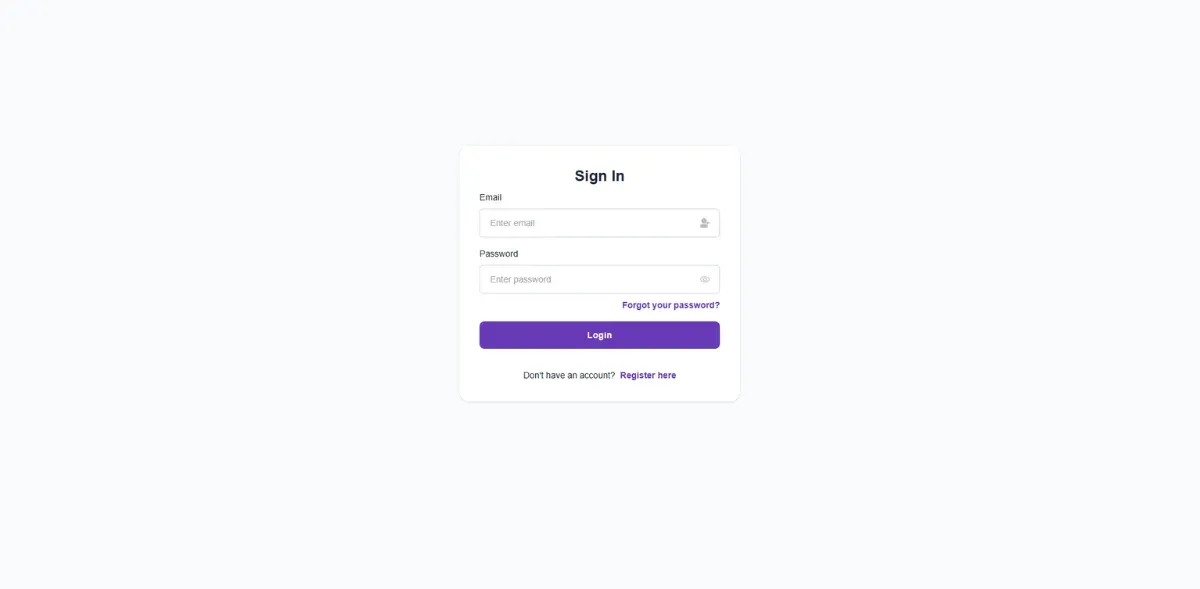
Step 3: You will be automatically redirected to the secure Maika Hub website in a new tab.
- If you already have a Maika Hub account, simply log in.
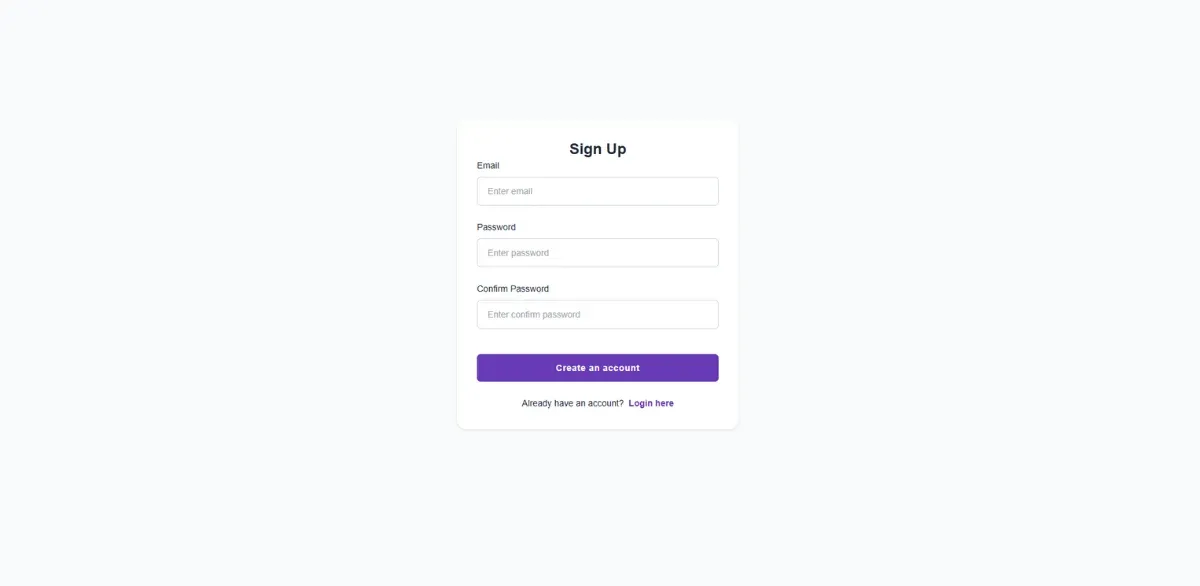
- If this is your first time, click on "Register here". The registration process is simple, requiring only your email and a password. Once registered, you'll be brought back to the login screen.
Step 4: After successfully logging in, you will be directed to the "Add Business" screen. This is the final step where you link your website.
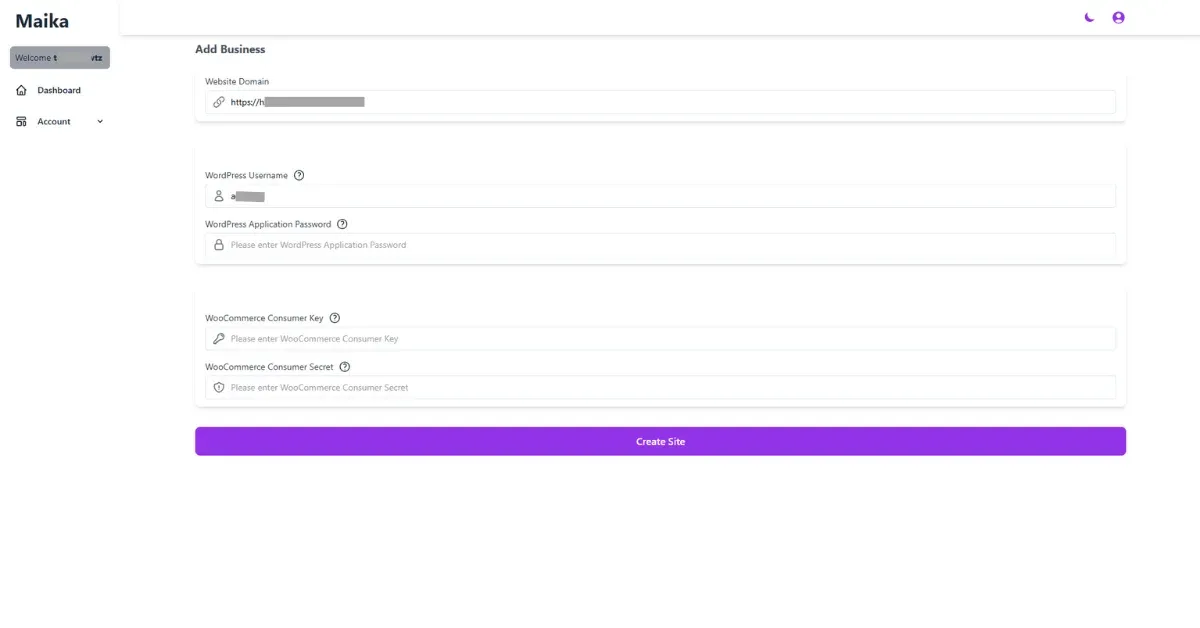
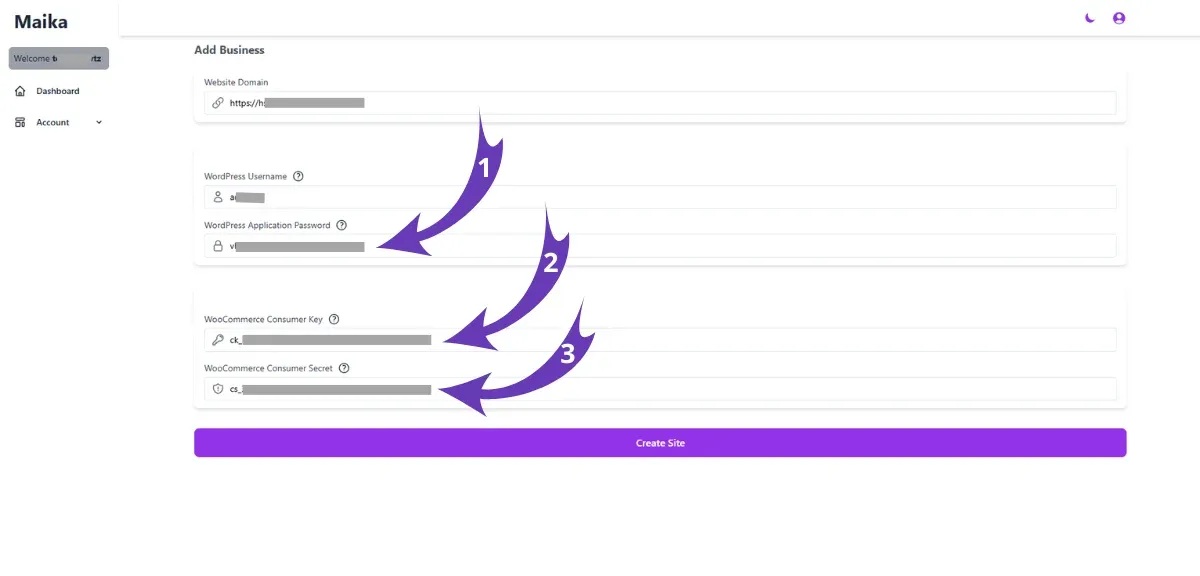
Step 5: You will see fields asking for the credentials you just generated. Carefully paste the keys you saved into the corresponding fields:
- The Website Domain (Has been autofilled)
- The WordPress Username (Has been autofilled)
- The WordPress Application Password (You will fill it out)
- The WooCommerce Consumer Key (You will fill it out)
- The WooCommerce Consumer Secret (You will fill it out)
Step 6: After filling in all the required business information, click the 'Create Site' button to complete the setup process.
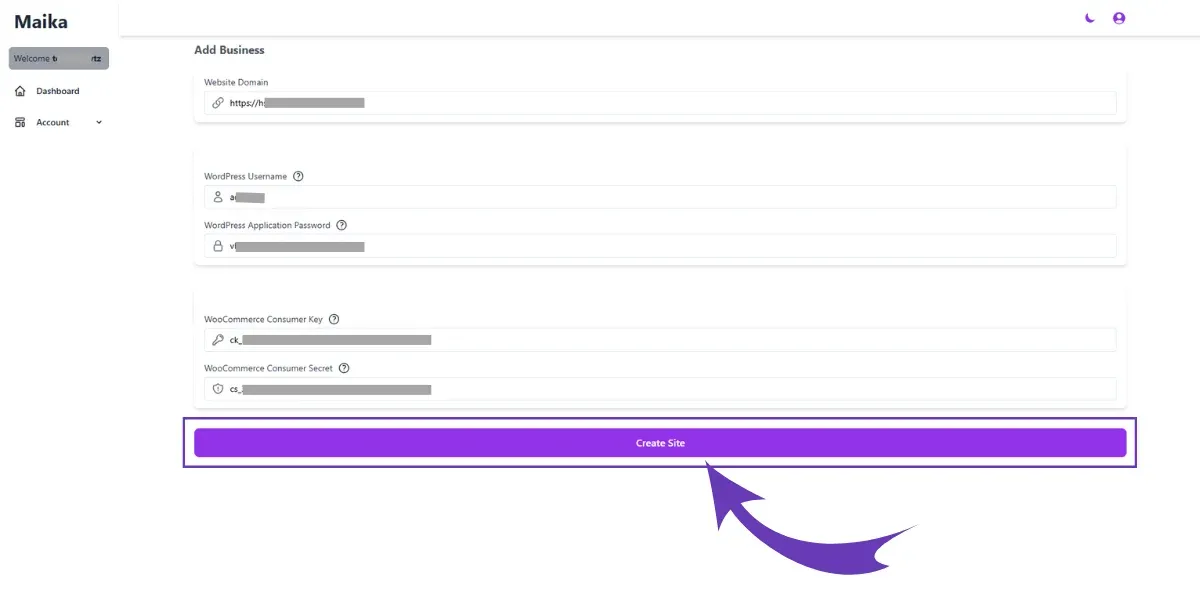
Congratulations! Your WooCommerce store is now securely connected to the Maika Hub. The AI brain is now linked to your store's nervous system.
What Happens Next? Unleashing AI on Your Store
Your connection is active, and Maika Genius is already at work. In the background, it begins the process of "ingesting" and learning from your product catalog. This initial learning phase is vital for the AI to build a foundational understanding of what you sell.
You can now begin to explore the incredible features available to you through the Maika Genius dashboard:
- AI Content Generation: Start by selecting a few products and task the AI with generating fresh, engaging, and SEO-optimized descriptions.
- Personalized Recommendations: As the AI learns from user traffic, its ability to recommend the right product to the right customer at the right time will grow, helping to increase your average order value.
- Intelligent Live Chat: Consider activating the live chat feature to provide 24/7 customer support, answer product questions, and guide users through their purchase journey without any human intervention required.
Conclusion: Your Journey with AI Has Begun
Connecting your WooCommerce store to the Maika Hub is more than just a technical step; it's a strategic move towards a smarter, more automated, and more profitable online business. You’ve established a secure bridge that allows one of the most advanced AI platforms to become your co-pilot, enhancing your store without compromising its speed or security.
You've moved beyond a static digital storefront. You now have a dynamic, learning entity ready to help you create better content, engage customers more effectively, and ultimately, drive more sales. The process is straightforward, secure, and unlocks a world of potential.
Now that you're connected, dive into your Maika Genius dashboard and start exploring. We’d love to hear about your experience and the first AI feature you put to the test. Share your story in the comments below!